# Hosted Fields JSAPI Guide
## Client Integration Manual
#### Basic
* [jsFiddle](https://jsfiddle.net/0tmq6c2h/)
Basic example based on Bootstrap 3
#### Example 1
* [JavaScript](https://github.com/PayMeService/payme-jsapi/blob/master/js/example1.js)
* [CSS](https://github.com/PayMeService/payme-jsapi/blob/master/css/example1.css)
#### Example 1 RTL
* [JavaScript](https://github.com/PayMeService/payme-jsapi/blob/master/js/example1-he.js)
* [CSS](https://github.com/PayMeService/payme-jsapi/blob/master/css/example1-he.css)
The same UI/UX example like Example 1 but shows how to tackle RTL languages
#### Example 2
* [JavaScript](https://github.com/PayMeService/payme-jsapi/blob/master/js/example2.js)
* [CSS](https://github.com/PayMeService/payme-jsapi/blob/master/css/example2.css)
#### Example 3
* [JavaScript](https://github.com/PayMeService/payme-jsapi/blob/master/js/example3.js)
* [CSS](https://github.com/PayMeService/payme-jsapi/blob/master/css/example3.css)
#### Example 4
* [JavaScript](https://github.com/PayMeService/payme-jsapi/blob/master/js/example4.js)
* [CSS](https://github.com/PayMeService/payme-jsapi/blob/master/css/example4.css)
### Step-by-step integration
Include Client API Library into `` section of your page
Put markup, designed by your own or corporate site template
Initialize integration with `API key`, get `Hosted Fields Manager` and manage protected fields using simple API
### [Click here to review our Github library](https://github.com/PayMeService/payme-jsapi)
### Include Client API Library
```html
...
...
...
```
#### Put your payment form markup
```html
...
```
----
#### Initialization and interaction
```html
...
...
```
Let's break down code, presented above.
First of all you must get and provide your Merchant API key from Settings page in the dashboard.
```js
...
// This is the Merchant API key (Test API key in this case)
var apiKey = 'xxxxxxxx-xxxx-xxxx-xxxx-xxxxxxxxxxxx';
...
```
Second, you must obtain integration instance for the merchant
```js
var apiKey = 'xxxxxxxx-xxxx-xxxx-xxxx-xxxxxxxxxxxx';
// There is optional configuration object with testMode: true
// because we are using the API key from the test server
PayMe.create(apiKey, { testMode: true })
.then(function (instance) {
// Here we can work with successfully initialized
// integration instance - Integration Manager
...
})
.catch(function(error) {
// Here you can handle instantiation error
...
});
...
```
#### Initialization settings
Property |Default value |Available values| Description
---|---|---|---
`testMode`| false| true / false| Test mode - used to control in which environment payment will be processed
`language` |'en' |'en' / 'he' |Language - controls the language of the messages and text direction (rtl or ltr). en (for English) or he (for Hebrew)
`tokenIsPermanent` |true| true / false| Token is permanent - Indicates whether it is a one-time-use or multi-use token
**Next step - to initialize integration type and get corresponding manager**
#### Hosted fields integration type
This integration type allows you to use secure way to collect user's sensitive data for making payments.
To obtain Hosted Fields manager you must call `hostedFields` method
```js
PayMe.create(key, { testMode: true })
.then(function (instance) {
// Getting Hosted Fields Integration manager
var fields = instance.hostedFields();
})
.catch(function(error) {
...
});
```
As soon as you have Hosted Fields Manager you are ready to create actual protected fields. You can create as many fields as you need but you can create each field type only once. It means if `cardNumber` field was created you can't create more `cardNumber` fields, but you can create `payerEmail` and other (for details see Tokenization section).
For example let's create 3 most important fields:
```js
PayMe.create(key, { testMode: true })
.then(function (instance) {
var fields = instance.hostedFields();
// Hosted fields creation
var cardNumber = fields.create('cardNumber');
var expiration = fields.create('cardExpiration');
var cvc = fields.create('cvc');
})
.catch(function(error) {
...
});
...
```
**Hint - We propose to create field names within `Payme.fields` object**
```js
// Instead of this
var cardNumber = fields.create('cardNumber');
// try to use this
var cardNumber = fields.create(PayMe.fields.NUMBER);
```
Having created all of necessary fields, they must be mounted to the chosen page place. Fields will be shown on your page only after mounting
```js
PayMe.create(key, { testMode: true })
.then(function (instance) {
var fields = instance.hostedFields();
var cardNumber = fields.create('cardNumber');
var expiration = fields.create('cardExpiration');
var cvc = fields.create('cvc');
// Mount credit card inside container with id="card-number-container"
cardNumber.mount('#card-number-container');
...
})
.catch(function(error) {
...
});
...
```
**Hint - Field instance mount method accepts any valid query selector**
```js
// Select by id
cardNumber.mount('#card-number-container');
// Select by class
cardNumber.mount('.credit-card-wrapper');
// Select by attribute
cardNumber.mount('[data-role="credit-card-input"]');
```
**Hint - We can be notified on result by promise, because field mounting is an asynchronous process**
```js
...
// Mount credit card inside container with id="card-number-container"
cardNumber.mount('#card-number-container').then(function() {
// Field was mounted successfully
}).catch(function(error){
// There is error handling code
});
...
```
#### Field Creation Options
`.create(field, options)` method accepts an optional second argument `options` which is helpful in case you want to customize the field created with it.
```js
var cardNumberFieldOptions = {
placeholder: 'Enter your Credit Card Number',
messages: {
required: 'The Credit Card Number is Required!',
invalid: 'Bad Credit Card Number'
},
styles: ... // see below
};
var cardNumber = fields.create('cardNumber', cardNumberFieldOptions);
```
The available properties for customization:
Property| Description
---|---
`placeholder`| Placeholder text for empty field
`messages`| Validation messages object, can have required and invalid properties (see Field Event Object and Examples page)
`styles` |CSS properties for "protected" fields (see Field Styling)
### Field Styling
Because the "protected" fields are protected, you can use only limited CSS properties and selectors:
Whitelisted CSS properties:
* `color`
* `font-size`
* `text-align`
* `letter-spacing`
* `text-decoration`
* `text-shadow`
* `text-transform`
Whitelisted CSS rules:
`::placeholder`
Allowed properties and selectors are organized into three groups within field creation configuration options.
```js
var cardNumberFieldOptions = {
placeholder: 'Enter your Credit Card Number',
// ...
styles: {
base: {
'color': '#000000',
'::placeholder': {
color: '#F2F2F2'
}
},
invalid: {
'color': 'red'
},
valid: {
'color': 'green'
}
}
};
```
Each group represents the state of the protected field like a CSS class. For example:
```css
/* base styles would be applied as a default style */
input.credit-card .base {
color: #000000;
font-size: 16px;
text-align: center;
letter-spacing: .25em;
text-decoration: underline;
text-shadow: 1px 1px 2px black, 0 0 1em red;
text-transform: uppercase;
}
input.credit-card ::placeholder {
color: gray;
}
/* .invalid styles would be applied on top of the .base when field validation fails */
input.credit-card .base .invalid {
color: red;
}
/* .valid styles would be applied on top of the .base when the field became valid */
input.credit-card .base .valid {
color: green;
}
```
**Note - This information is related only to "protected" fields, which were created with [Hosted Fields Integration manager](https://github.com/PayMeService/payme-jsapi#hosted-fields-integration-type) via .create(...) and .mount(...) call. In case you are going to use your own markup/widget/etc. for any additional fields (first name, last name, email, phone number, social ID) then you are free to use any CSS code to style them.**
#### Hosted fields integration interaction
Right after field creation you can use field instance to listen basic set of events to interact with code on your page.
For example, let's listen keyup event on credit card field:
```js
PayMe.create(key, { testMode: true })
.then(function (instance) {
var fields = instance.hostedFields();
var cardNumber = fields.create('cardNumber');
...
cardNumber.on('keyup', function(event) {
console.log(event);
})
// Mount credit card inside container with id="card-number-container"
cardNumber.mount('#card-number-container');
...
})
.catch(function(error) {
...
});
...
```
and each time when `keyup` event occurs on `cardNumber` field you will be notified. Keep in mind, for security reasons event object was significantly simplified (see **Field Event Object**)
#### Field events
Using field events your can build you own logic. There is available limited set of events out of the box, those caused by security reasons
Event type |Fields| Description
---|---|---
`change`| all| works like standard change
`blur `|all| works like standard blur
`focus `|all| works like standard focus
`keyup` |all| works like standard keyup
`keydown`| all| works like standard keydown
`keypress `|all| works like standard keypress
`validity-changed` |all| emits when field validity state changed. Can be used for showing error messages
`card-type-changed` |`cardNumber`| emits when library detects vendor of entered Credit Card number
#### Field Event Object
Shape of `change`, `blur`, `focus`, `keyup`, `keydown`, `keypress`, `validity-changed` are the same among all the fields and can be either valid or not
```json
// Valid field
{
type: "focus",
event: "focus", // event type
field: "cardNumber", // field which emits this event
isValid: false // field validity status
}
```
```js
// Invalid field
{
type: "focus",
event: "focus", // event type
field: "cardNumber", // field which emits this event
isValid: false, // field validity status
message: "Bad credit card number" // validation error message
}
```
Shape of card-type-changed is little bit different and it can be used for displaying credit card brand icon
```js
// Valid field
{
type: "card-type-changed"
event: "card-type-changed"
field: "cardNumber"
isValid: true,
cardType: "visa" // Card vendor
}
```
```js
// Invalid field
{
type: "card-type-changed"
event: "card-type-changed"
field: "cardNumber"
isValid: false
message: "Bad credit card number",
cardType: "visa" // Card vendor
}
```
here cardType property can be founded. All available types are listed below
cardType value| Brand |Mask
---|---|---
`unknown`| Unknown brand|
`amex` |**American Express**: starts with 34/37| 34♦♦ ♦♦♦♦♦♦ ♦♦♦♦
`diners`| **Diners Club:** starts with 300-305/309...| 300♦ ♦♦♦♦♦♦ ♦♦♦♦
`jcb` |**JCB:** starts with 35/2131/1800 |35♦♦ ♦♦♦♦ ♦♦♦♦ ♦♦♦♦
`visa` |**VISA:** starts with 4 |4♦♦♦ ♦♦♦♦ ♦♦♦♦ ♦♦♦♦
`mastercard`| **MasterCard:** starts with 51-55/22-27 |51♦♦ ♦♦♦♦ ♦♦♦♦ ♦♦♦♦
`discover`| **Discover**: starts with 6011/65/644-649 |6011 ♦♦♦♦ ♦♦♦♦ ♦♦♦♦
So far so good, now you have form with some fields and you are ready to tokenize sensitive data to create actual sale
#### Tokenization
Tokenization Is a process of storing sensitive data in the protected vault and providing safe data for you, to make actual payment
To kick off tokenization you must call tokenize(...) method on Ingeration Manager instance
```js
PayMe.create(key, { testMode: true })
.then(function (instance) {
var fields = instance.hostedFields();
...
// Data for tokenization
var saleData = {
payerFirstName: 'Foo',
payerLastName: 'Bar',
payerEmail: 'foo-bar@domain.com',
payerPhone: '1231231',
payerSocialId: '12345',
payerZipCode: '123456',
total: {
label: 'Order #123123',
amount: {
currency: 'USD',
value: '55.00',
}
}
};
// Call for tokenization
instance.tokenize(saleData)
.then(function (tokenizationResult) {
// Successfull tokenization
//
// Now you can send 'tokenizationResult' to
// your server and call `generate-sale` on Core API
console.log(tokenizationResult);
})
.catch(function(tokenizationError) {
// Failed tokenization
//
// you can explore 'tokenizationError' object and show error message on your taste
console.error(tokenizationError)
});
})
...
...
```
If you want let your users input additional data (First name, Last name, Email, Phone number, Social ID) rather provide by yourself you can use native HTML inputs within your page (please check our examples page). This approach let you to use any presenting, styling, formatting logic. To help you with validation we were exposing validators to you
#### Additional fields validators
Particular validator can be obtained and used by this code
```js
// ...
var firstNameValidator = PayMe.validators[PayMe.fields.NAME_FIRST];
var validation = firstNameValidator.test('John');
// ...
console.log(validation);
```
#### Additional fields validation result
If validation result is success then `validation` would be `null` in the other case:
* `{required: true}` - if firstNameValidator.test(...) argument not defined
* `{invalid: true}` - if firstNameValidator.test(...) argument has unallowable value
#### Note
Values within additional fields must pass exposed validators. Without fulfilling this condition tokenization will fail!
**tokenizationResult Structure (successful tokenization)**
```js
{
// Safe Credit Card data
card: {
cardMask: "411111******1111",
cardholderName: "Firstname Lastname",
expiry: "1119"
},
// Service data
type: "tokenize-success",
testMode: true,
token: "BUYER154-0987247Y-MLJ10OI7-LXRDNDYP", // Payment token for generating payment
// Payer data
payerEmail: "firstname-lastname@domain.com",
payerName: "Firstname Lastname",
payerPhone: "1231231",
payerSocialId: "111123",
// Payment data
total: {
label: "🚀 Rubber duck",
amount: {
currency: "USD",
value: "55.00"
}
}
}
```
**tokenizationError structure (tokenization failed)**
```js
{
// Says that the form contains invalid values
validationError: true
// Here you can find error messages for particular field
errors: {
payerEmail: "Mandatory field",
payerPhone: "Mandatory field"
},
type: "tokenize-error",
}
```
Also, you can receive such shape (may be changed in the future)
```js
{
// This error means that tokenization has already
// performed for this Intergation Instance
error: "Bad session",
message: "Session expired or deleted",
statusCode: 400,
type: "tokenize-error",
}
```
### Tokenization and Mounted fields
As was mentioned above you can create as many different fields as you need but sometimes you have some user's data, supposed to be filled and you don't want bother your users requested filling their data again. You can do that, just provide it within `Data for tokenization` object.
For example if you already have email or First + Last Name and you want provide it directly, you can to it
```js
PayMe.create(key, { testMode: true })
.then(function (instance) {
var fields = instance.hostedFields();
// Create and Mount credit card field
var cardNumber = fields.create('cardNumber');
cardNumber.mount('#card-number-container');
...
// Create and Mount credit card expiration field
...
// Create and Mount CVV field
...
// Create and Mount Social Id field
...
// Create and Mount Phone number field
...
// Provide all available data
var saleData = {
payerFirstName: 'Foo', // First name field wasn't created, we must provide value
payerLastName: 'Bar', // Last name field wasn't created, we must provide value
payerEmail: 'foo-bar@domain.com', // Email field wasn't created, we must provide value
// payerPhone: '1231231', // value isn't needed due created Phone number field
// payerSocialId: '12345', // value isn't needed due created Social Id field
// payerZipCode: '123456', // value isn't needed due created Zip Code field
total: {
label: 'Order #123123',
amount: {
currency: 'USD',
value: '55.00',
}
}
};
// Call for tokenization
instance.tokenize(saleData)
.then(function (tokenizationResult) {
// Successfull tokenization
//
// Now you can send 'tokenizationResult' to
// your server and call `generate-sale` on Core API
console.log(tokenizationResult);
})
.catch(function(tokenizationError) {
// Failed tokenization
//
// you can explore 'tokenizationError' object and show error message on your taste
console.error(tokenizationError)
});
})
...
...
```
#### Rule of thumb
If you didn't create field - provide corresponding value in tokenization payload, but with one exception. You can't provide values for Credit Card Number, Credit Card Expiration and CVV - corresponding fields must be created and mounted always
### What should be done with tokenized data?
You as an embedder may decide by yourself but main idea is **send tokenization data to backend and generate sale** using [Generate sale](/payments-migrated/hosted-payment-page/post-generate-sale)
Let's say you have such tokenization result and sent it to your backend:
```js
{
card: {
cardMask: "411111******1111",
cardholderName: "Firstname Lastname",
expiry: "1119"
},
type: "tokenize-success",
testMode: true,
token: "BUYER154-0987247Y-MLJ10OI7-LXRDNDYP",
payerEmail: "firstname-lastname@domain.com",
payerName: "Firstname Lastname",
payerPhone: "1231231",
payerSocialId: "111123",
total: {
label: "🚀 Rubber duck",
amount: {
currency: "USD",
value: "55.00"
}
}
}
```
On the backend side you can start building the generate-sale payload
Generate Sale Attribute| Tokenization Attribute
---|---
`sale_price`| `tokenizationData.total.amount.value` - must be converted to the integer
`product_name`|` tokenizationData.total.label`
`currency` |`tokenizationData.total.amount.currency`
`buyer_key`|` tokenizationData.token`
and send it to the `https://.payme.io/api/generate-sale`
#### Security notes:
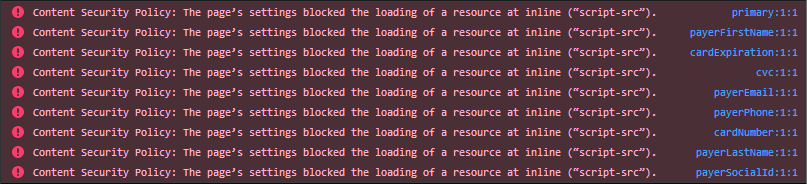
Our service has a strict Content Security Policy (CSP) which in some cases might cause error messages to appear in the browser console. These errors do not cause any kind of malfunction or security risk to our service, and you can safely ignore them.
* In most cases the errors are caused by third party extensions installed on the browser. Try turning off the extensions or browse in private mode.
* The error messages might also be caused by potentially malicious JavaScripts or browser extensions which inject JavaScript to the content pages. Our service is protected against such threats.
**Errors examples:**
## 3DS Integration Using JS API
### Step #1 - Setup
This point is identical to what was described in [Include Client API Library](https://github.com/PayMeService/payme-jsapi#include-client-api-library). You do not need to provide any HTML markup for this interaction if you only use this API to get client information for making payments with 3Ds.
[JSFiddle Example](https://jsfiddle.net/7ywn9g3L/10/)
### Step #2 - Invoke and Handle hashing result
To obtain client information hash, you as implementer must call the method upon PayMe object and handle Promise resolution.
```html
...
...
...
...
...
...
```
##### Important Note
PayMe.clientData(isTestMode) can accept boolean argument to indicate that payment doing in test mode
### Step #3 - Consume The Encrypted Data
After receiving the hashed client information, the implementer must send this hash to your Back-End server and use it as a parameter for pay-sale (as described below)
### Step #4 - Initiate Payment Flow
In order to initiate a payment flow, the implementer must have the following 2 data objects:
* *Buyer Key*
* *JWT Token*
When you have these two parameters, you are good to go in the matters of starting a payment flow
### Step #5 - APIs to complete the payment
In order to complete the payment, you’ll need to use 2 API endpoints:
generate-sale
pay-sale
#### Generate-sale API request to ../api/generate-sale
```json
{
"seller_payme_id": "MPL16148-77043XMH-T5MOWMZB-DDTAZOPP",
"sale_price": "1000",
"currency": "eur",
"product_name": "Shirt",
"sale_type": "sale",
"sale_payment_method": "credit-card",
"sale_callback_url": "URL"
}
```
**In the case of a challenge, you will receive the 3DS flow result to the callback URL you will provide in the generate-sale request.**
#### Expected Response
```json
{
....
"payme_sale_id": "SALE1655-3843870J-NTPYLJNW-SOWRLK9X",
.....
}
```
#### With the sale ID received in the response, you’ll be able to initiate the request to pay-sale:
```json
{
"seller_payme_id":"MPL15130-83274SO0-SAUCJ4KX-TVEDZCIN",
"sale_price":"1000",
"currency":"ILS",
"installments":"1",
"language": "en",
"sale_callback_url": "https://www.example.com/payment/callback",
"sale_return_url": "https://www.example.com/payment/success",
"capture_buyer": 0,
"payme_sale_id": "SALE1654-092102PD-2KRBHZMM-YMP33H7R",
"buyer_email": "idan@payme.io",
"buyer_name": "jordan sssssssssssss",
"buyer_social_id": 311234488,
"meta_data_jwt":"eyJ0eXAiOiJKV1QiLCJhbGciOiJSUzI1NiIsImN0eSI6Impzb24ifQ.eyJpYXQiOjE2NTUzODQ3NDEsIm5iZiI6MTY1NTM4NDc0MSwiZXhwIjoxNjU1Mzg4MzQxLCJqdGkiOiJlMDBkOTYzMy02ZWExLTRjMTMtOWU4Zi01OTVhYjMyMjU4ZDIiLCJkYXRhIjp7ImlwIjoiMTIzNDUuMTIzNC4zMyIsImFjY2VwdCI6InRleHRcL2h0bWwiLCJqYXZhRW5hYmxlZCI6dHJ1ZSwiamF2YVNjcmlwdEVuYWJsZWQiOnRydWUsImxhbmd1YWdlIjoiaGUtaWwiLCJjb2xvckRlcHRoIjoyLCJzY3JlZW4iOnsiaGVpZ2h0IjoxMi4yLCJ3aWR0aCI6MTIuM30sInRpbWV6b25lIjoiSmVydXNhbGVtIiwidXNlckFnZW50IjoiTW96aWxsYVwvNS4wIChXaW5kb3dzIE5UIDYuMTsgV2luNjQ7IHg2NDsgcnY6NDcuMCkgR2Vja29cLzIwMTAwMTAxIEZpcmVmb3hcLzQ3LjAifX0.WbyU3ejj2PaG9EEPJRxsTqhyB_SuAWgzqJyi6l5l_Fpw3dDpv9obpcPme-7ViGdOTJ97Qn1GKe8wXBU-Y5tZcrLVbwm4w_hGtvCZFC7FNrALTFg1JH7OIFs4ChpvlqegkvWEzjlOp27bU0VuV3gGAiFEhAXffO9W9hgy8px37nUXZtZUbS0zU2b8KcGjmALhUoti8laIkTet4yXLi4fLBcLA0P0BiBuNdS3owdszehsdDwMOQGdtQYTT9C2ZNOMktvKAYdO8xINS__5Rpqz6WB69T8uvdT2ASjx_--0m-XoCKC05dHH_27g0RQ_rpEYnE-vKIeQW70_LHIsL2tLBCg"
}
```
### Response Handling
**If the 3DS flow ended in a challenge (URL is received in the next described response), you will get the following response:**
```json
{
"status_code": 5,
"status_message": "יוצר דף אימות, נא להמתין",
"redirect_url": "REDIRECT CHALLANGE URL"
}
```
**If the 3DS flow ended in a seamless flow (no challenge required), you will get the following response:**
```json
{
"status_code": 0,
"payme_status": "success",
"status_error_code": null,
"payme_sale_id": "SALE1655-2121212Y-BWFVU1YE-BQ2J6SUW",
"payme_sale_code": 20511311,
"sale_created": "2022-06-14 16:08:41",
"payme_sale_status": "initial",
"sale_status": "completed",
"currency": "ILS",
"transaction_id": "",
"is_token_sale": false,
"price": 1000,
"payme_signature": null,
"sale_deferred_months": null,
"status_error_details": null,
"redirect_url": null,
"transaction_cc_auth_number": "1172408",
"payme_transaction_auth_number": "1172408".
"3ds_sale": true
}
```
**If the 3DS flow ended in a failure, you will get the following response:**
```json
{
"status_code": 1,
"payme_status": "success",
"status_error_code": null,
"payme_sale_id": "SALE1655-2121212Y-BWFVU1YE-BQ2J6SUW",
"payme_sale_code": 20511311,
"sale_created": "2022-06-14 16:08:41",
"payme_sale_status": "failure",
"sale_status": "failure",
"currency": "ILS",
"transaction_id": "",
"is_token_sale": false,
"price": 1000,
"payme_signature": null,
"sale_deferred_months": null,
"status_error_details": null,
"redirect_url": null,
"transaction_cc_auth_number": "1172408",
"payme_transaction_auth_number": "1172408".
"3ds_sale": false
}
```
**To verify 3DS authentication was succesfull**, you can query the transaction using [get transactions endpoint](/payments-migrated/query-apis/post-get-transactions) and check parameter `sale_is_3ds`
### Moving to Production
After completing your testing period you will get your production credentials, this means that you should also modify your library to work with our **Production Environment**.
In order to work with our production environment you should modify the following component:
```js
const isTestMode = false;
```
Set `isTestMode` to `false` will modify the requests to pass through to our production environment. You can go back to testing in any moment by modifying the component to:
```js
const isTestMode = true;
```